
I am slowly but surely filling up our house with quilts. But since our couch is getting quite full, I've recently started thinking about other ways to incorporate quilts into our house. I love the useful nature of quilts as well as the visual appeal so I decided to make a set of quilted placemats using my Not Alone Star quilt pattern. It was also a good project to practice my hand-quilting. I hand-quilted all of these placemats in the evenings over a few days - the perfect relaxing couch evening activity.
This would also be the perfect project to update your Thanksgiving or Christmas table decor or to make a set or two as holiday gifts! Homemade gifts are my favorite to give and receive.

Not Alone Star Placemats Tutorial: Supplies
- Not Alone Star quilt pattern: Printed pattern or PDF pattern
- Fabric - To make 8 placemats follow the fabric requirements for the *Baby Size Not Alone Star Quilt
- Marking tool - I use a Sewline pencil to do all my fabric marking
- Pins
- Batting - I used leftover from several quilts I had longarm quilted. You will need (8) 16" squares of batting
*The only exception to the fabric requirements are for Backing and Binding fabric:
- Backing Fabric: 2 yards
- Binding Fabric: 1 yard (2.25" binding strips)

Not Alone Star Placemats Tutorial: Instructions
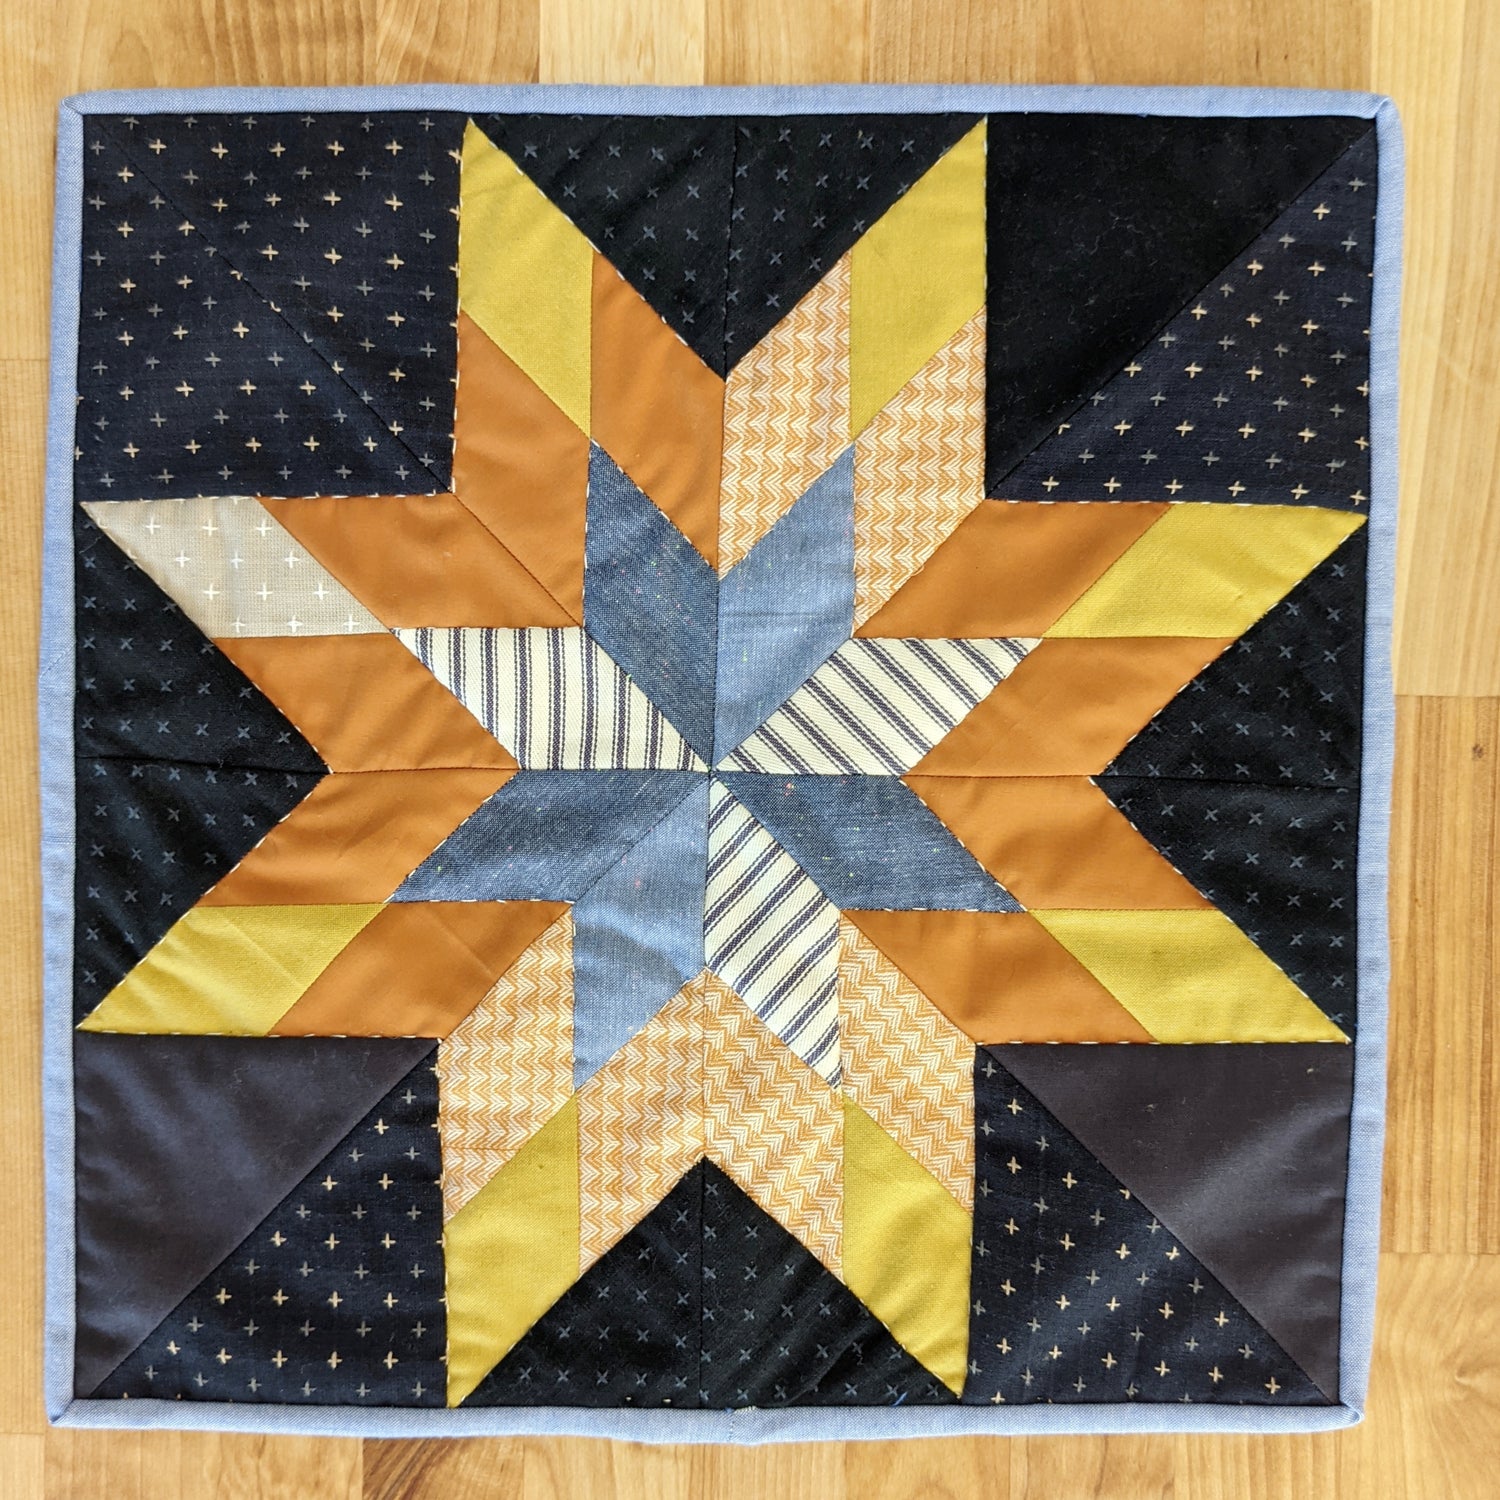
Follow steps 1 through 15 in the Not Alone Star quilt pattern to sew and assemble your star "blocks" (placemats). I made my placemats scrappy with a variety of golds, blues, and browns for the stars and a variety of dark grays and blacks for the background. The binding is Peppered Cotton in Blue Bell.
Cut (8) 16" squares from your backing fabric.
Cut (16) 2.25" strips from your binding fabric.
Make a quilt sandwich with your star block, batting, and backing fabric and Baste as desired. My preference is to pin baste because it is less messy than spray basting (in my opinion).
Quilt as desired. Like I said, I used these placemats as a good project to practice my hand-quilting. I quilt using DMC floss and I love the look of a thicker thread and big stitches. I followed the outline of the star and the outline of the inner star to make my hand-quilting stitches.


Once you have quilted the placemats, trim and square up the placemats. They will be 15" square.
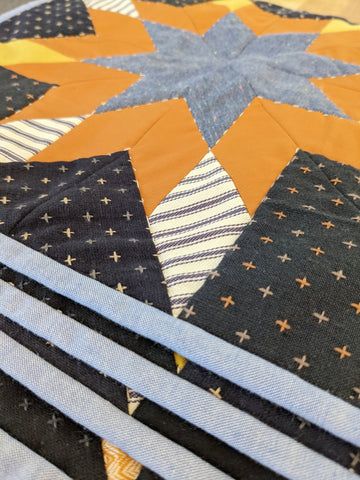
Sew (2) binding strips together for each placemat. I sewed the binding onto the front with my sewing machine then hand-stitched the binding on the back of the placemats using a big exposed stitch. I love how this adds extra character to each placemat.

And that's it! Make a set for yourself and a set for someone else! Or a Thanksgiving set for yourself AND a Christmas set for yourself. You have options.
Happy sewing!
Be sure to tag #plainsandpine and #notalonestarquilt if you share photos of your project on Instagram. I'd love to see what you make!
27 comments
Robert Alfred
CRYPTO SCAM RECOVERY SUCCESSFUL – A TESTIMONIAL OF LOST PASSWORD TO YOUR DIGITAL WALLET BACK.
My name is Robert Alfred, Am from Australia. I’m sharing my experience in the hope that it helps others who have been victims of crypto scams. A few months ago, I fell victim to a fraudulent crypto investment scheme linked to a broker company. I had invested heavily during a time when Bitcoin prices were rising, thinking it was a good opportunity. Unfortunately, I was scammed out of $120,000 AUD and the broker denied me access to my digital wallet and assets. It was a devastating experience that caused many sleepless nights. Crypto scams are increasingly common and often involve fake trading platforms, phishing attacks, and misleading investment opportunities. In my desperation, a friend from the crypto community recommended Capital Crypto Recovery Service, known for helping victims recover lost or stolen funds. After doing some research and reading multiple positive reviews, I reached out to Capital Crypto Recovery. I provided all the necessary information—wallet addresses, transaction history, and communication logs. Their expert team responded immediately and began investigating. Using advanced blockchain tracking techniques, they were able to trace the stolen Dogecoin, identify the scammer’s wallet, and coordinate with relevant authorities to freeze the funds before they could be moved. Incredibly, within 24 hours, Capital Crypto Recovery successfully recovered the majority of my stolen crypto assets. I was beyond relieved and truly grateful. Their professionalism, transparency, and constant communication throughout the process gave me hope during a very difficult time. If you’ve been a victim of a crypto scam, I highly recommend them with full confidence contacting:
Email: Capitalcryptorecover@zohomail.com
Telegram: @Capitalcryptorecover
Contact: Recoverycapital @ fastservice. com
Call/Text: +1 (336) 390-6684
Website: https://recovercapital.wixsite.com/capital-crypto-rec-1
Suzan Leo
HIRE WIZARD GEO COORDINATES RECOVERY HACKER TO RECOVER YOUR LOST / STOLEN CRYPTO / BITCOIN / USDT / ETH
I want to quickly tell you all about an Authorized hacker that can help you recover your lost cryptocurrency. WIZARD GEO COORDINATES RECOVERY HACKER. Their goal is to help victims of bitcoin and cryptocurrency scam/fraud recover their digital funds from scammers operating offshore. I recommend them to anyone who has fallen victim to a crypto scam. For more info. You can reach them via Email:
Email: geovcoordinateshacker@gmail.com
WhatsApp ( +1 ( 318 ) 203-3657 )
Website; https://geovcoordinateshac.wixsite.com/geo-coordinates-hack
Thank you so much WIZARD GEO COORDINATES RECOVERY HACKER for assisting me in recovering my stolen cryptocurrency funds. I was devastated and couldn’t grasp what had happened to me when I was locked out of my account but I’m truly grateful for the service of WIZARD GEO COORDINATES RECOVERY HACKER.
Bruno James
I NEED A TRUSTED CRYPTO HACKER THAT CAN RESTORE LOST OR SCAMMED FUNDS.
Are you struggling to get back the money you lost? Every day, countless individuals face the devastating impact of scam operations that drain their hard-earned savings. But there’s good news – GEO COORDINATES RECOVERY HACKER are here to help you recover what’s rightfully yours. I lost my entire savings to a fake crypto investment scam while I was looking for a way to double my savings. After many weeks of trying to find a way to get my money back with no success, I finally came across a crypto recovery company GEO COORDINATES RECOVERY HACKER, a reliable and trustworthy crypto recovery company. I’m immensely grateful for his dedication, professionalism, and unwavering support. You can get in touch with them through below contact details
Email: geovcoordinateshacker@gmail.com
Telegram @Geocoordinateshacker
WhatsApp ; +1 ( 318 ) 203-3657
Website; https://geovcoordinateshac.wixsite.com/geo-coordinates-hack
I had to send out my review also. They are indeed recommendable.
Wefred Zero
WHAT CAN I DO TO RECOVER MY STOLEN BITCOIN? CONSULT // GEO COORDINATES RECOVERY HACKER
I have read a lot of stories about people losing money to investment scams. I too have been a victim of this scams. I lost about $700 in Bitcoin some months ago, I searched around and tried to work with people ,unfortunately I was scammed as well. This happened for months until I came across GEO COORDINATES RECOVERY HACKER. I would first want to thank GEO COORDINATES RECOVERY HACKER for their professional support and unshakable devotion, which resulted in the successful recovery of my money. I would highly recommend them to anyone in need of such services. Details for getting in touch: Email:
Email: geovcoordinateshacker@gmail.com
Website; https://geovcoordinateshac.wixsite.com/geo-coordinates-hack
Telegram: @Geocoordinateshacker
TOP𝟭♻️𝓓𝓐𝓘𝓜𝓞𝓝𝓓➊➏➑🟩♻️
https://raindrop.io/nondiamomd1/diamond-12-1-69-65405752
https://mastodon.social/@bluerocker01/115881312992440842
https://guyanahub.com/post/8250
https://guyanahub.com/post/8251
https://guyanahub.com/post/8252
https://opensource.ieee.org/-/snippets/94
https://diamondlnwpg168.com/
Leave a comment
This site is protected by hCaptcha and the hCaptcha Privacy Policy and Terms of Service apply.